There’s no denying that SSH is the de facto tool for *nix server administration. It’s far from perfect, but it was designed with security in mind, and there’s been a huge amount of tooling written over the years to make it easier to use. In addition, many popular products and just about every server deployment system integrate with SSH somehow. It is universally supported across pretty much all architectures and distributions, from Raspberry Pi’s all the way up to massive supercomputer clusters.
The industry best practices for SSH security include using certificates, two-factor authentication, and SSH bastion hosts. Below, we practically explain how to implement these best practices in detail using working sample commands and configurations with OpenSSH users in mind.
Most people can agree that using public key authentication for SSH is generally better than using passwords. Nobody ever types in a private key, so it can’t be keylogged or observed over your shoulder. SSH keys have their own issues, however.
The next level up from SSH keys is SSH certificates. OpenSSH has supported the use of certificates since OpenSSH 5.4 which was released back in 2010.
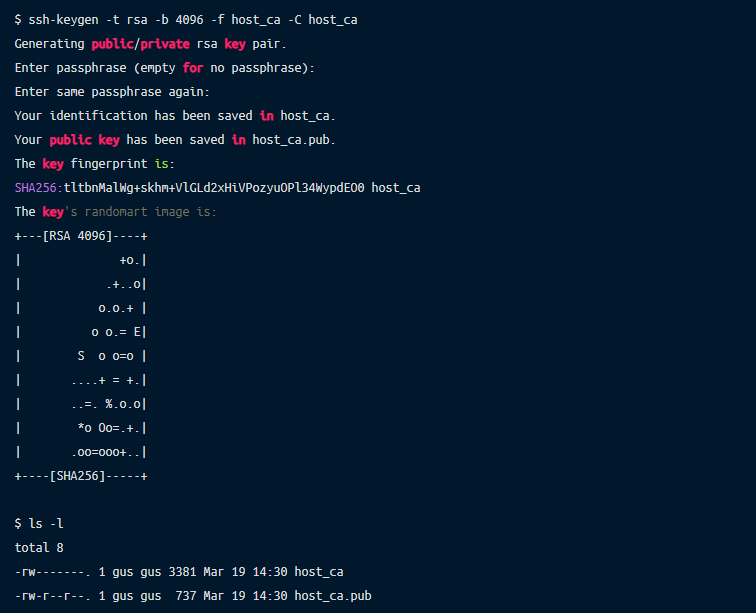
With SSH certificates, you generate a certificate authority (CA) and then use this to issue and cryptographically sign certificates which can authenticate users to hosts, or hosts to users. You can generate a keypair using the ssh-keygen command, like this:

The host_ca file is the host CA’s private key and should be protected. Don’t give it out to anyone, don’t copy it anywhere, and make sure that as few people have access to it as possible. Ideally, it should live on a machine which doesn’t allow direct access and all certificates should be issued by an automated process.
In addition, it’s best practice to generate and use two separate CAs – one for signing host certificates, one for signing user certificates. This is because you don’t want the same processes that add hosts to your fleet to also be able to add users (and vice versa). Using separate CAs also means that in the event of a private key being compromised, you only need to reissue the certificates for either your hosts or your users, not both at once.
As such, we’ll also generate a user_ca with this command:
The user_ca file is the user CA’s private key and should also be protected in the same way as the host CA’s private key.
In this example, we’ll generate a new host key (with no passphrase), then sign it with our CA. You can also sign the existing SSH host public key if you’d prefer not to regenerate a new key by copying the file (/etc/ssh/ssh_host_rsa_key.pub) from the server, signing it on your CA machine, and then copying it back.

ssh_host_rsa_key-cert.pub contains the signed host certificate.
Here’s an explanation of the flags used:
-s host_ca: specifies the filename of the CA private key that should be used for signing.-I host.example.com: the certificate’s identity – an alphanumeric string that will identify the server. I recommend using the server’s hostname. This value can also be used to revoke a certificate in future if needed.-h: specifies that this certificate will be a host certificate rather than a user certificate.-n host.example.com: specifies a comma-separated list of principals that the certificate will be valid for authenticating – for host certificates, this is the hostname used to connect to the server. If you have DNS set up, you should use the server’s FQDN (for example host.example.com) here. If not, use the hostname that you will be using in an ~/.ssh/config file to connect to the server.-V +52w: specifies the validity period of the certificate, in this case 52 weeks (one year). Certificates are valid forever by default – expiry periods for host certificates are highly recommended to encourage the adoption of a process for rotating and replacing certificates when needed.You also need to tell the server to use this new host certificate. Copy the three files you just generated to the server, store them under the /etc/ssh directory, set the permissions to match the other files there, then add this line to your/etc/ssh/sshd_config file:
Once this is done, restart sshd with systemctl restart sshd.
Your server is now configured to present a certificate to anyone who connects. For your local ssh client to make use of this (and automatically trust the host based on the certificate’s identity), you will also need to add the CA’s public key to your known_hosts file.
You can do this by taking the contents of the host_ca.pub file, adding @cert-authority *.example.com to the beginning, then appending the contents to ~/.ssh/known_hosts:
@cert-authority *.example.com ssh-rsa AAAAB3NzaC1yc2EAAAADAQABAAACAQDwiOso0Q4W+KKQ4OrZZ1o1X7g3yWcmAJtySILZSwo1GXBKgurV4jmmBN5RsHetl98QiJq64e8oKX1vGR251afalWu0w/iW9jL0isZrPrmDg/p6Cb6yKnreFEaDFocDhoiIcbUiImIWcp9PJXFOK1Lu8afdeKWJA2f6cC4lnAEq4sA/Phg4xfKMQZUFG5sQ/Gj1StjIXi2RYCQBHFDzzNm0Q5uB4hUsAYNqbnaiTI/pRtuknsgl97xK9P+rQiNfBfPQhsGeyJzT6Tup/KKlxarjkMOlFX2MUMaAj/cDrBSzvSrfOwzkqyzYGHzQhST/lWQZr4OddRszGPO4W5bRQzddUG8iC7M6U4llUxrb/H5QOkVyvnx4Dw76MA97tiZItSGzRPblU4S6HMmCVpZTwva4LLmMEEIk1lW5HcbB6AWAc0dFE0KBuusgJp9MlFkt7mZkSqnim8wdQApal+E3p13d0QZSH3b6eB3cbBcbpNmYqnmBFrNSKkEpQ8OwBnFvjjdYB7AXqQqrcqHUqfwkX8B27chDn2dwyWb3AdPMg1+j3wtVrwVqO9caeeQ1310CNHIFhIRTqnp2ECFGCCy+EDSFNZM+JStQoNO5rMOvZmecbp35XH/UJ5IHOkh9wE5TBYIeFRUYoc2jHNAuP2FM4LbEagGtP8L5gSCTXNRM1EX2gQ== host_caThe value *.example.com is a pattern match, indicating that this certificate should be trusted for identifying any host which you connect to that has a domain of *.example.com – such as host.example.com above. This is a comma-separated list of applicable hostnames for the certificate, so if you’re using IP addresses or SSH config entries here, you can change this to something like host1,host2,host3 or 1.2.3.4,1.2.3.5 as appropriate.
Once this is configured, remove any old host key entries for host.example.com in your ~/.ssh/known_hosts file, and start an ssh connection. You should be connected straight to the host without needing to trust the host key. You can check that the certificate is being presented correctly with a command like this:
$ ssh -vv host.example.com 2>&1 | grep "Server host certificate"
debug1: Server host certificate: ssh-rsa-cert-v01@openssh.com SHA256:dWi6L8k3Jvf7NAtyzd9LmFuEkygWR69tZC1NaZJ3iF4, serial 0 ID "host.example.com" CA ssh-rsa SHA256:8gVhYAAW9r2BWBwh7uXsx2yHSCjY5OPo/X3erqQi6jg valid from 2020-03-17T11:49:00 to 2021-03-16T11:50:21
debug2: Server host certificate hostname: host.example.com
At this point, you could continue by issuing host certificates for all hosts in your estate using your host CA. The benefit of doing this is twofold: you no longer need to rely on the insecure trust on first use (TOFU) model for new hosts, and if you ever redeploy a server and therefore change the host key for a certain hostname, your new host could automatically present a signed host certificate and avoid the dreaded WARNING: REMOTE HOST IDENTIFICATION HAS CHANGED! message.
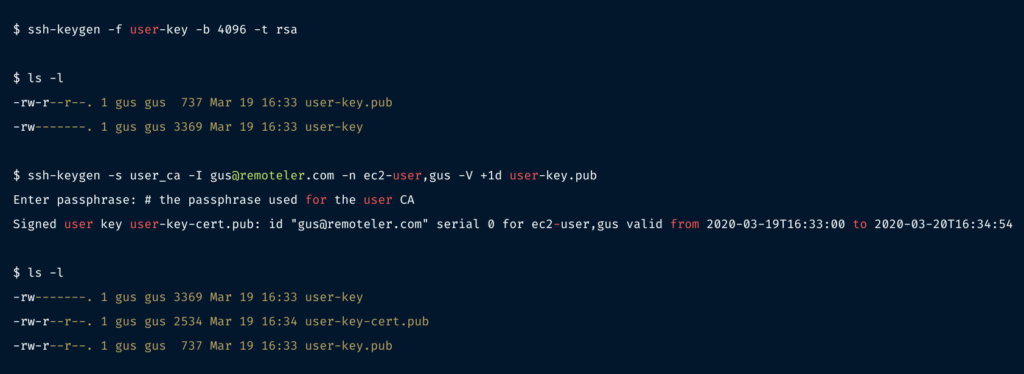
In this example, we’ll generate a new user key and sign it with our user CA. It’s up to you whether you use a passphrase or not.

user-key-cert.pub contains the signed user certificate. You’ll need both this and the private key (user-key) for logging in.
Here’s an explanation of the flags used:
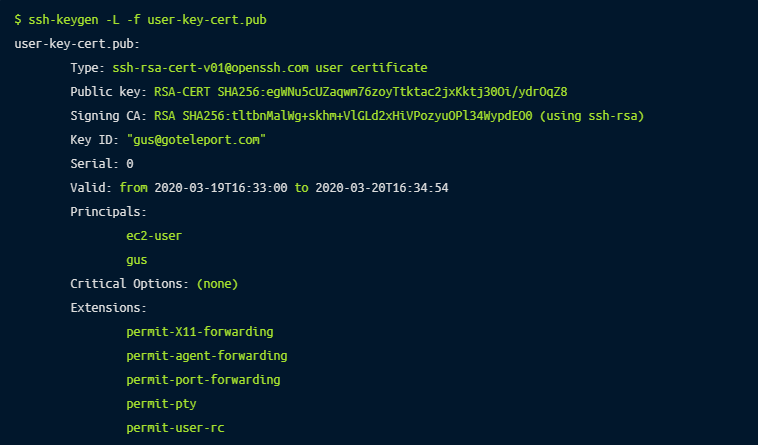
-s user_ca: specifies the CA private key that should be used for signing-I gus@remoteler.com: the certificate’s identity, an alphanumeric string that will be visible in SSH logs when the user certificate is presented. I recommend using the email address or internal username of the user that the certificate is for – something which will allow you to uniquely identify a user. This value can also be used to revoke a certificate in future if needed.-n ec2-user,gus: specifies a comma-separated list of principals that the certificate will be valid for authenticating, i.e. the *nix users which this certificate should be allowed to log in as. In our example, we’re giving this certificate access to both ec2-user and gus.-V +1d: specifies the validity period of the certificate, in this case +1d means 1 day. Certificates are valid forever by default, so using an expiry period is a good way to limit access appropriately and ensure that certificates can’t be used for access perpetually.If you need to see the options that a given certificate was signed with, you can use ssh-keygen -L:

Once you’ve signed a certificate, you also need to tell the server that it should trust certificates signed by the user CA. To do this, copy the user_ca.pub file to the server and store it under /etc/ssh, fix the permissions to match the other public key files in the directory, then add this line to /etc/ssh/sshd_config:
Once this is done, restart sshd with systemctl restart sshd.
Your server is now configured to trust anyone who presents a certificate issued by your user CA when they connect. If you have a certificate in the same directory as your private key (specified with the -i flag, for example ssh -i /home/gus/user-key ec2-user@host.example.com), it will automatically be used when connecting to servers.
If you look in your server’s sshd log (for example, by running journalctl -u sshd), you will see the name of the certificate being used for authentication, along with the fingerprint of the signing CA:

If the user tries to log in as a principal (user) which they do not have permission to use (for example, their certificate grants ec2-user but they try to use root), you’ll see this error in the logs:

If the certificate being presented has expired, you’ll see this error in the logs:

One way that you could make further use of user certificates is to set up a script which will use your CA to issue a certificate to log into production servers, valid only for the next two hours. Every use of this script or process could add logs as to who requested a certificate and embed their email address into the certificate. After this is done, every time the user uses that certificate to access a server (regardless of which principal they log in as), their email address will be logged. This can provide a useful part of an audit trail.
There are many other useful things you can do with SSH certificates, such as forcing a specific command to be run when presenting a certain certificate, or denying the ability to forward ports, X11 traffic or SSH agents. Take a look at man ssh-keygen for some ideas.
Another way to improve your SSH security is to enforce the use of a bastion host – a server which is specifically designed to be the only gateway for access to your infrastructure. Lessening the size of any potential attack surface through the use of firewalls enables you to keep a better eye on who is accessing what.
Switching to the use of a bastion host doesn’t have to be an arduous task, especially if you’re using SSH certificates. By setting up your local ~/.ssh/config file, you can automatically configure all connections to hosts within a certain domain to go through the bastion.
Here’s a very quick example of how to force SSH access to any host in the example.com domain to be routed through a bastion host, bastion.example.com:

To make this even simpler, if you add user-key to your local ssh-agent with ssh-add user-key, you can also remove the IdentityFile entries from the SSH config file.
Once you’re using the bastion host for your connections, you can use iptables (or another *nix firewall configuration tool of your choosing) on servers behind the bastion to block all other incoming SSH connections. Here’s a rough example using iptables:

It’s a good idea to leave a second SSH session connected to the bastion while running these commands so that if you inadvertently input the wrong IP address or command, you should still have working access to the bastion to fix it via the already-established connection.
For further details on configuring and securing bastion hosts, read our tutorial on setting up bastion hosts and recommended best practices for SSH bastion hosts.
2-factor authentication makes it more difficult for bad actors to log into your systems by enforcing the need for two different “factors” or methods to be able to successfully authenticate.
This usually comes down to needing both “something you know” (like a password, or SSH certificate in our example) and “something you have” (like a token from an app installed on your phone, or an SMS with a unique code). One other possibility is requiring the use of “something you are” – for example a fingerprint, or your voice.
In this example, we’ll install the google-authenticator pluggable authentication module, which will require users to input a code from the Google Authenticator app on their phone in order to log in successfully. You can download the app for iOS here and Android here.
As a general note, it’s always important to consider the user experience when enforcing security measures. If your measures are too draconian then users may attempt to find ways to defeat and work around them, which will eventually reduce the overall security of your systems and lead to the creation of back doors. To give our users a reasonable experience in this example, we are only going to require 2-factor authentication to be able to log into our bastion host. Once authenticated there, users should be able to log into other hosts simply by using their valid SSH certificate. This combination should give an acceptable level of security without interfering too much with user workflows. With this in mind, however, it is always prudent and appropriate to enforce extra security measures in specific environments which contain critical production data or sensitive information.
On RHEL/CentOS based systems, you can install the google-authenticator module from the EPEL repository:

For Debian/Ubuntu-based systems, this is available as the libpam-google-authenticator package:
The google-authenticator module has many options you can set which are documented here. In the interest of saving time, we are going to use some sane defaults in this example: disallow reuse of the same token twice, issue time-based rather than counter-based codes, and limit the user to a maximum of three logins every 30 seconds. To set up Google 2-factor authentication with these settings, a user should run this command:
You can also run google-authenticator with no flags and answer some prompts to set up interactively if you prefer.
This will output a QR code that the user can scan with the app on their phone, plus some backup codes which they can use if they lose access to the app. These codes should be stored offline in a secure location.
Scan the generated QR code for your user now with the Google Authenticator app and make sure that you have a 6-digit code displayed. If you need to edit or change any settings in future, or remove the functionality completely, the configuration will be stored under ~/.google_authenticator.
To make the system enforce the use of these OTP (one-time password) codes, we’ll first need to edit the PAM configuration for the sshd service (/etc/pam.d/sshd) and add this line to the end of the file:
The nullok at the end of this line means that users who don’t have a second factor configured yet will still be allowed to log in so that they can set one up. Once you have 2-factor set up for all your users, you should remove nullok from this line to properly enforce the use of a second factor.
We also need to change the default authentication methods so that SSH won’t prompt users for a password if they don’t present a 2-factor token. These changes are also made in the /etc/pam.d/sshd file:
auth substack password-auth by adding a # to the beginning of the line: #auth substack password-auth@include common-auth by adding a # to the beginning of the line: #@include common-authSave the /etc/pam.d/sshd file once you’re done.
We also need to tell SSH to require the use of 2-factor authentication. To do this, we make a couple of changes to the /etc/ssh/sshd_config file.
Firstly, we need to change ChallengeResponseAuthentication no to ChallengeResponseAuthentication yes to allow the use of PAM for credentials.
We also need to set the list of acceptable methods for authentication by adding this line to the end of the file (or editing the line if it already exists):
This tells SSH that it should require both a public key (which we are going to be satisfying using an SSH certificate) and a keyboard-interactive authentication (which will be provided and satisfied by the sshd PAM stack). Save the /etc/ssh/sshd_config file once you’re done.
At this point, you should restart sshd with systemctl restart sshd. Make sure to leave an SSH connection open so that you can fix any errors if you need to. Restarting SSH will leave existing connections active, but new connections may not be allowed if there is a configuration problem.
Connect to your bastion host directly and you should see a prompt asking you for your 2-factor code:

Type the code presented by your Google Authenticator app and your login should proceed normally.
If you check the sshd log with journalctl -u sshd, you should see a line indicating that your login succeeded:

SSH is a powerful tool which often grants a lot of access to anyone using it to log into a server. In this post, I detailed a few different ways that you can easily improve the security of your SSH model without needing to deploy a new application or make any huge changes to user experience.
In essence, the recommended industry best practices for SSH security are:
The methods above give practical examples of several ways in which you can improve the security of your SSH infrastructure, all while giving users the flexibility to keep using the tools they’re familiar with.
Remoteler is an open source access plane offering a secure bastion host, certificate-based authentication, and two-factor authentication by default. Remoteler can be used as a drop-in replacement to OpenSSH server and OpenSSH-based bastion hosts with additional security features, including role-based access control and session audits. Learn how Remoteler works or try one for yourself today.