Passwordless is a form of authentication that doesn’t require users to provide passwords during login. That much you could glimpse from the name, but how does it work? What are its trade-offs?
This blog post will do its best to explain to you how passwordless can be implemented using modern technologies such as Web Authentication (WebAuthn), while at the same time providing better user experience and security than the traditional password-based approach.
While talking about passwordless, we’ll also discuss usernameless. As the name implies, it refers to authentication that doesn’t require users to provide their username during login. It’s possible to have passwordless without usernameless, but we might as well solve both, as the effort is almost the same.
The Web Authentication standard and APIs, WebAuthn for short, is at the heart of how passwordless is implemented nowadays. Therefore, it’s important to have an idea of how WebAuthn works and take a peek at the features we’ll use to build our passwordless system.
WebAuthn is a complex standard with many moving parts. It’s also part of a larger set of specifications, known as the FIDO2 specifications. FIDO2 also includes WebAuthn’s client-side counterpart, the Client-to-Authenticator Protocol specification (CTAP for short). We won’t get into FIDO2, CTAP, or the many other acronyms in the ecosystem in detail. For now just be aware that those parts exist. WebAuthn can be a loaded term — most of the time, when we discuss WebAuthn, we mean the authentication protocol derived from the standard.
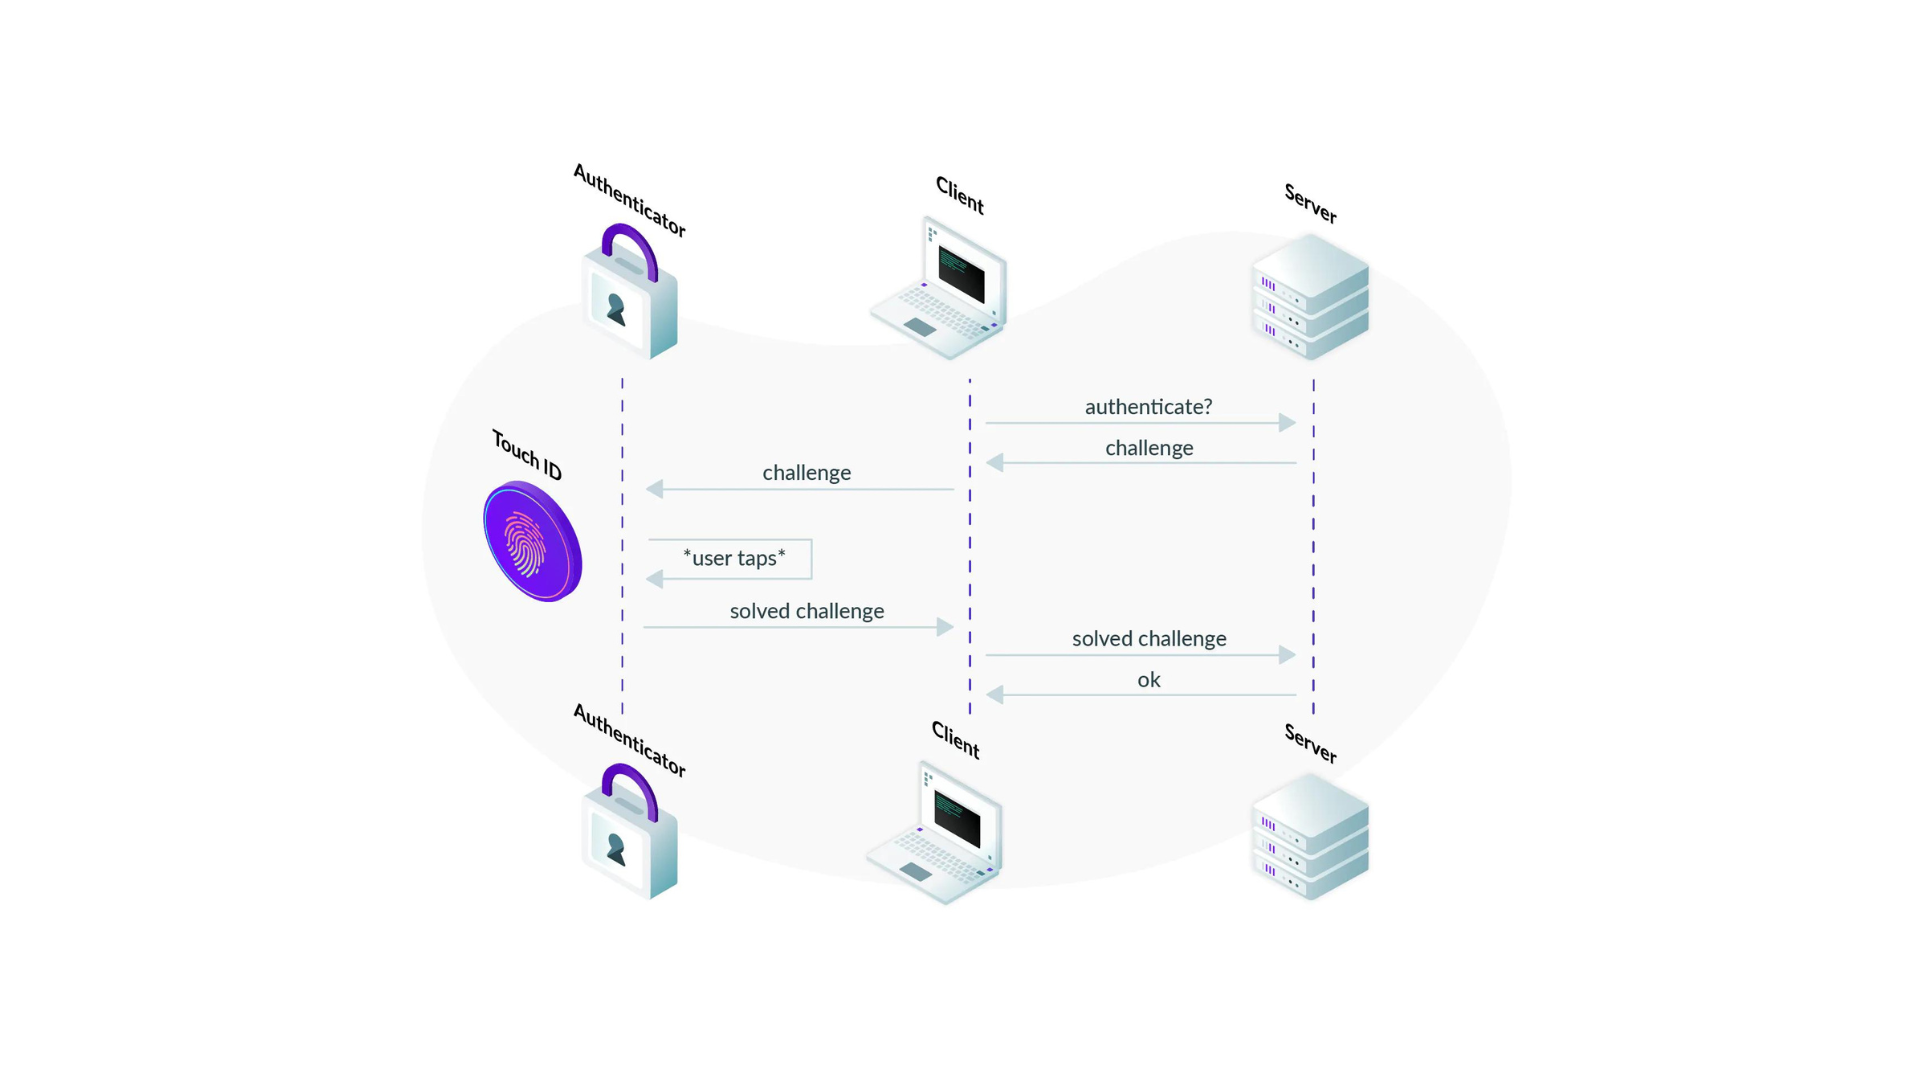
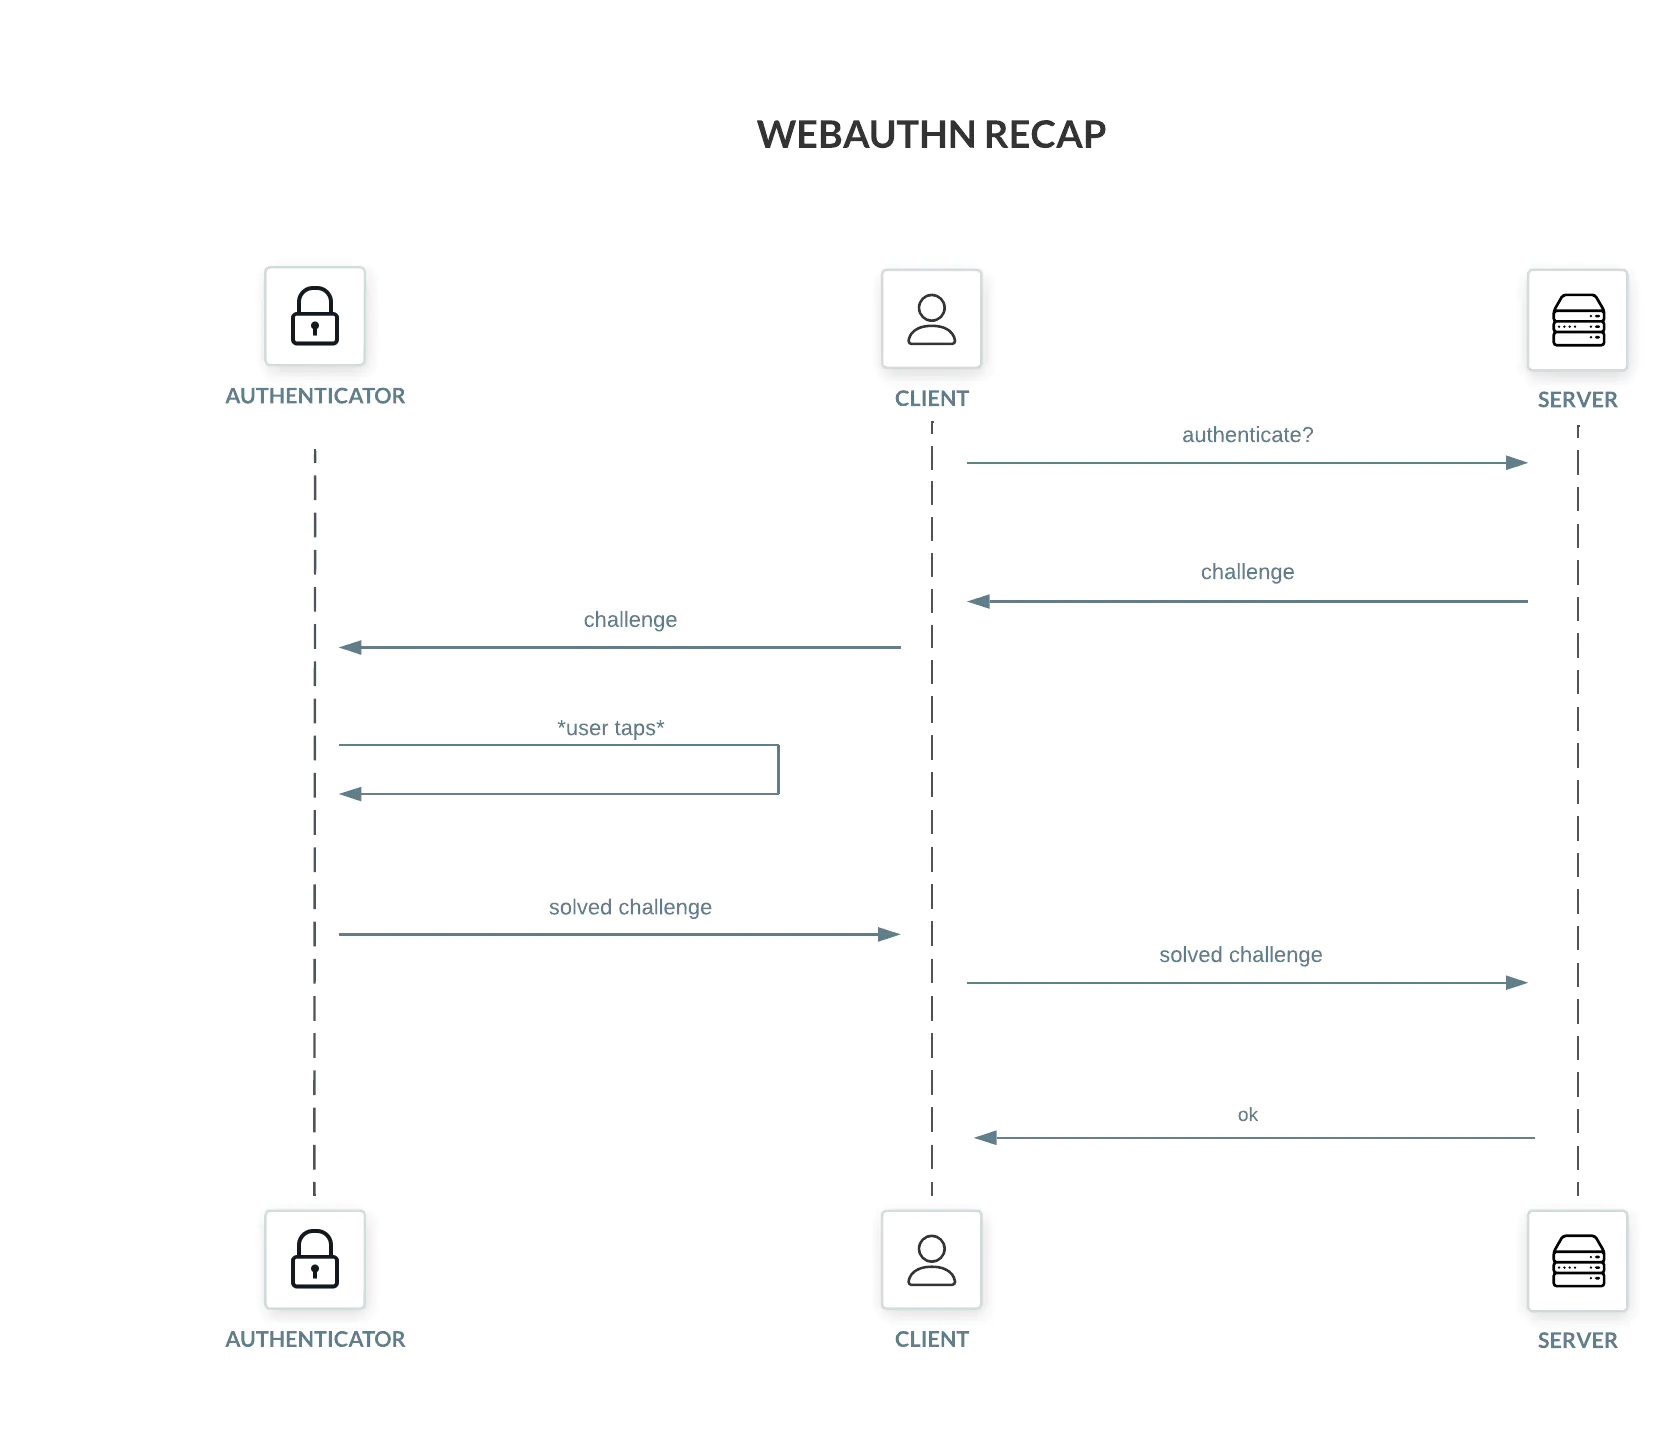
WebAuthn can be described as a challenge-response protocol. The participants of the protocol are the authenticator (e.g., a YubiKey or SoloKey), the client (e.g., a web browser) and the Relying Party (aka server). Driving the client and interacting with the authenticator is the user trying to authenticate themselves.

Let’s assume WebAuthn is used to implement a 2nd factor check, possibly using a YubiKey or SoloKey as the authenticator. The server (aka Relying Party) creates an authentication challenge and sends it to the client (a web browser). The client sends the challenge for the authenticator to “solve” and prompts the user to touch the authenticator. After the touch, the authenticator is unlocked, solves the challenge and returns it to the client, which relays the solution to the server, completing the ceremony.
The authenticator, from the point of view of the server, is essentially a private key. “Solving” a challenge means signing a randomly-generated byte string using the authenticator’s private key. Because of the registration ceremony (which we’ll glance over for now), the server knows the public keys of all the authenticators of the user, so it checks the signature against those public keys before granting access. In truth there are many more details, but that is the gist of it.
An important characteristic of good authenticators is that they cannot be driven solely by software. A good authenticator requires physical input to unlock access to its private keys and ensures that those keys never leave the hardware. This is important to avoid malicious processes from using the authenticator without user consent.
One of the enablers of passwordless are discoverable credentials (previously called resident credentials). Discoverable credentials are credentials stored within the authenticator, including information such as the username, a nice display name, the Relying Party ID and name, among others.
The recorded information in a discoverable credential allows the user to choose a credential directly from the authenticator, without interacting with the Relying Party. This enables both passwordless and usernameless in a single stroke (remember, the username is in the authenticator).
“How are discoverable credentials different from ‘regular’ credentials?”, you may ask. Aren’t all credentials stored in the authenticator? The short answer is no.
Before WebAuthn there was U2F, the Universal 2nd Factor specification. U2F was designed to allow hardware devices to provide an infinite number of registrations, which they managed by not storing key material, but instead sending those keys to the Relying Party. Technically, the hardware device has a master key locked behind user interaction (a tap). During the registration ceremony a new private key is created, encrypted using the authenticator’s master key and sent as the key handle for the Relying Party to store. For the authentication ceremony, the Relying Party sends back the key handles of the user to the authenticator, which in turn can decrypt those handles and complete the ceremony (assuming one of the handles is correct).
WebAuthn inherited the behavior above, meaning that non-discoverable credentials don’t have to be stored in the authenticator. Since they aren’t stored in the authenticator, the Relying Party has to send the key handles back. As a consequence:
The requirements above are perfectly reasonable for 2nd factor ceremonies, but not for passwordless. Discoverable credentials solve all those problems.
Another important feature for passwordless, and another distinction between WebAuthn and U2F, is the capacity for user verification.
A traditional, U2F-based authentication ceremony combines two different proofs from the user: a proof of identity (aka “something you know”, the password) and a proof of presence (aka “something you have”, the tap in the authenticator). As far as the ceremony is concerned, the password proves the users’ identity, so the tap in the authenticator definitely came from the user. (Malicious scripts haven’t learned to tap physical objects yet, something we take solace in). If we take away the password, then what proves the user identity? The answer is user verification.
User verification is a guarantee, made by the authenticator, that the users’ identity was somehow verified. For example, the authenticator may have a fingerprint scanner, or it may prompt the user for a PIN. Assuming it did verify the users’ identity, the solved challenge will carry the user verification bit to the Relying Party.
User verifications rolls both proof of identity and proof of presence into the WebAuthn authentication ceremony, without the need for passwords or shared secrets between the user and the RP. The Relying Party knows the user was present and verified by checking the user presence and verification bits. This pushes a lot of responsibility to the authenticator. But what if the authenticator is malicious or untrustworthy? (Hint: keep on reading.)
User verification puts considerable responsibility on the authenticator, so it’s reasonable for the Relying Party to want additional guarantees. Attestation is a feature of the registration ceremony that lets RPs acquire trustworthy information about the authenticator’s manufacturer, make and model (among others) from the authenticator itself.
Attestation is not new to WebAuthn, but attestation formats were greatly expanded in relation to U2F. We won’t go into details about attestation, attestation keys and attestation certificates; suffice to say that those are adequate to determine the legitimacy of the authenticator.
Attestation is an optional feature and is highly dependent on your company’s characteristics. Which authenticator does your company trust? Answers vary greatly. Many opt to not restrict authenticators at all, instead trusting users to make reasonable choices (and use secure browsers too!).
It’s interesting to note that, at least today, attestation doesn’t always yield relevant device information for certain combinations of authenticators and clients. For example, Chrome relies on self attestation for Touch ID, since it can’t securely employ a different format.
We’ve talked about WebAuthn, discoverable credentials and user verification. We’ve also compared WebAuthn to its predecessor, U2F, and described various features WebAuthn introduced. Let’s now put it all together, comparing a traditional 2nd factor authentication flow with passwordless.

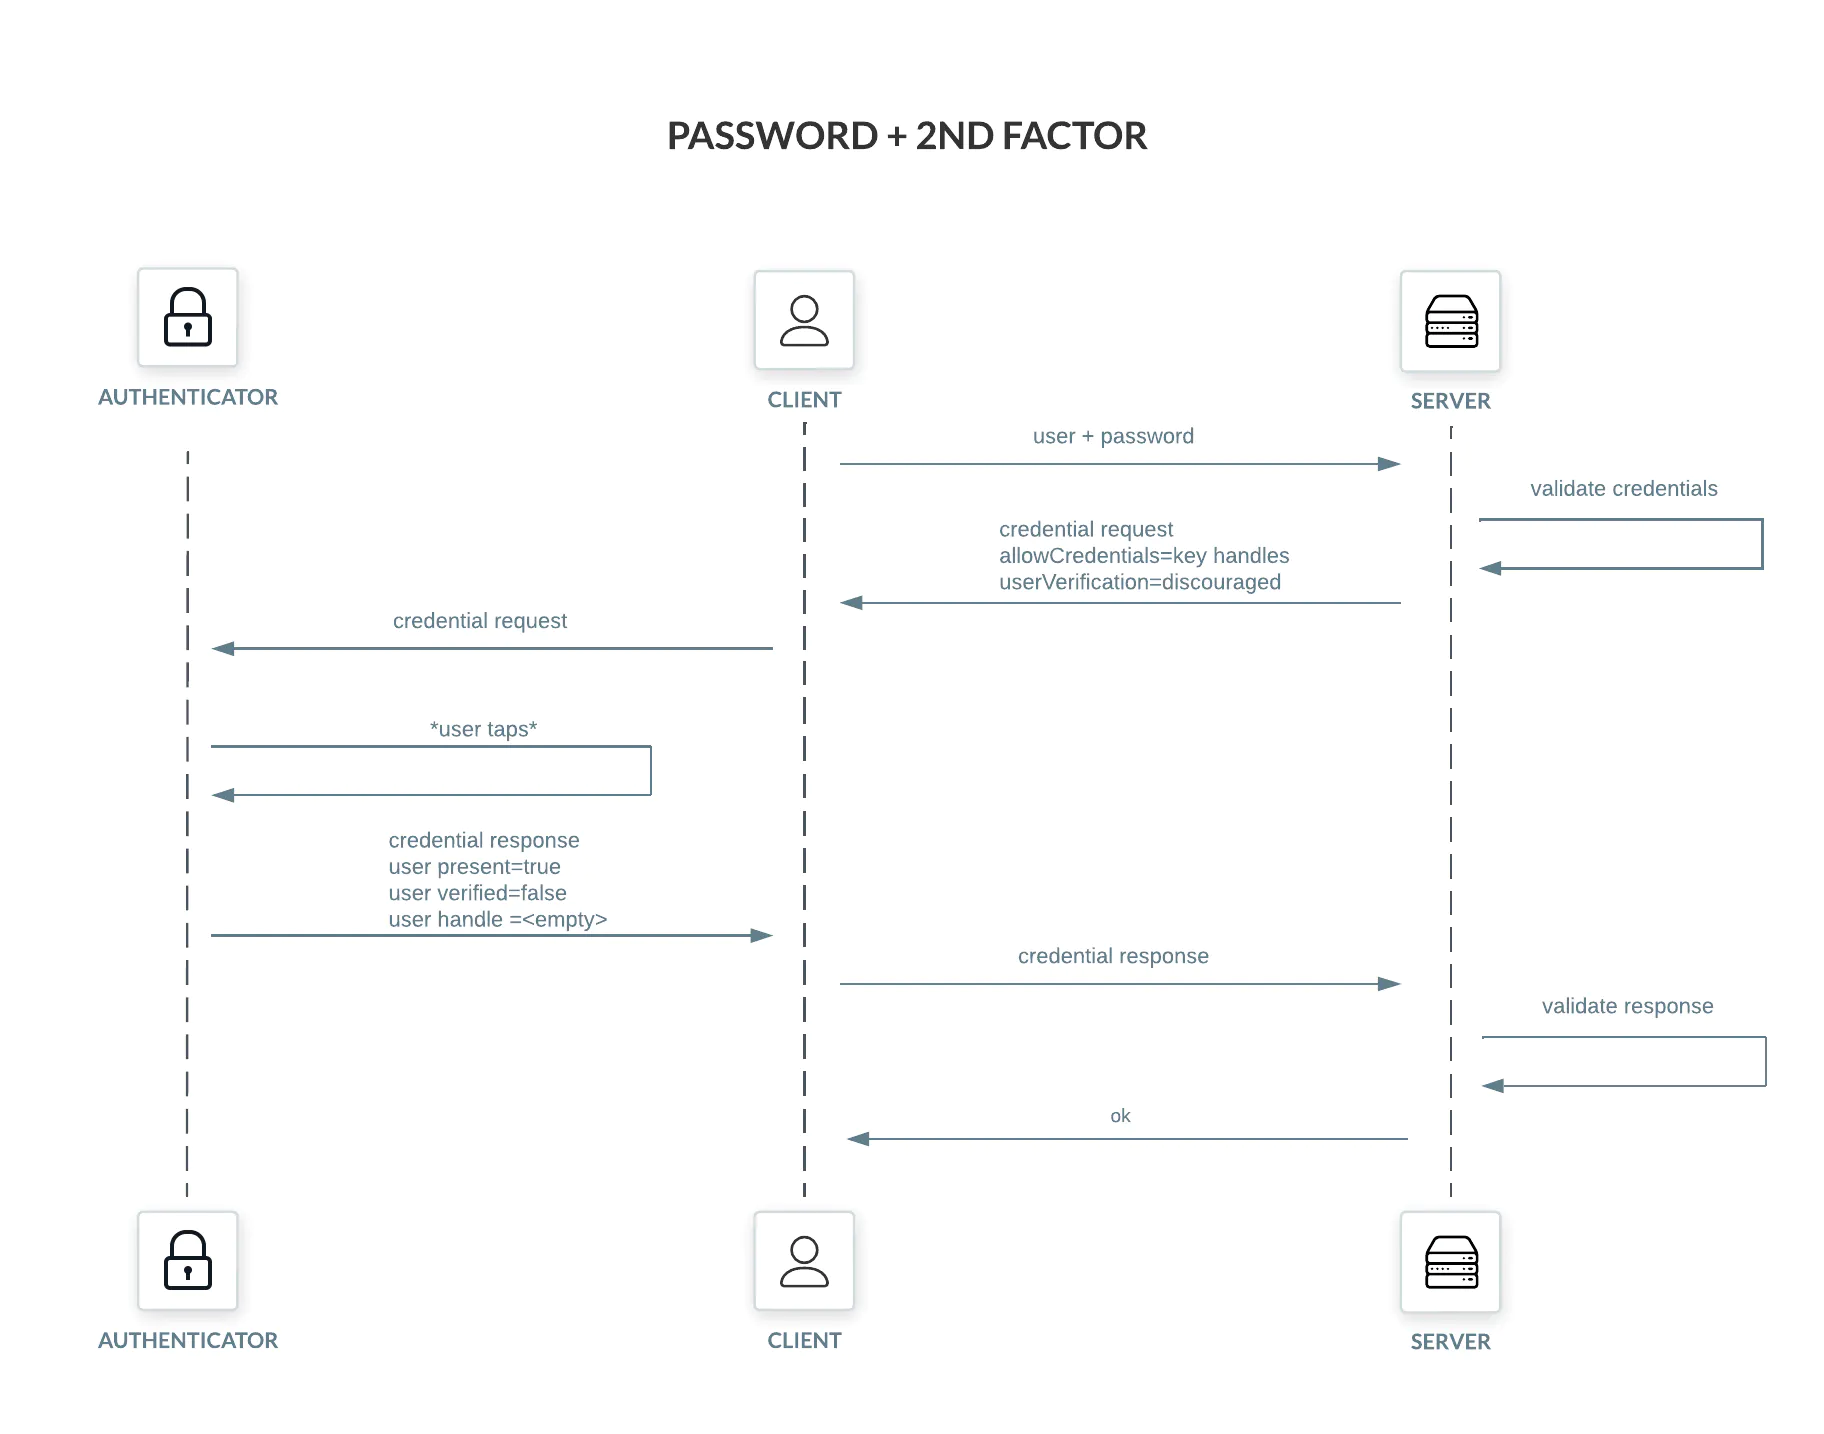
Password plus 2nd factor authentication starts by supplying the username and password to the server. This information is used to unlock the next step, which is the 2nd factor challenge. Notably for us, the challenge includes the key handles of all known authenticators in the “allowCredentials” field and “userVerification” is set to “discouraged” (the server already verified the user through the password). The rest of the ceremony goes as expected.
Example of a 2nd factor challenge, aka credential request:
{
  "publicKey": {
    "challenge": "eQYlENu2tdpH1B3H93c4BB0lYxSprP6Bz9aLFSWFubM",
    "rpId": "example.com",
    "allowCredentials": [
      {"type": "public-key", "id": "eP30ysvVWB7JoP/yIW/WKn1l//EQtHHFKprB0LVNskEWnMWaw+1aFP3tJnBfy10aUmRy/C9NrY0tefLe8SvTPw=="},
      {"type": "public-key", "id": "GXk7M7+kbdGKy2atYYvJve0VvT9u9CxQpLDQhRy0DlsZfzG424WxzgLNxi631PlawIIoHcI9GYT6Mjb50S/TKg=="},
      {"type": "public-key", "id": "FpOJ545Pl296pTrKb1uM0CDO8pM0Ty+iP8WEvX/eWD6KXHRuuSBkcDChMt5748ZKxoUI+l1quPNoEMzDF4TCIg=="}
    ],
    "userVerification": "discouraged"
  }
}
Let’s contrast the above with passwordless:

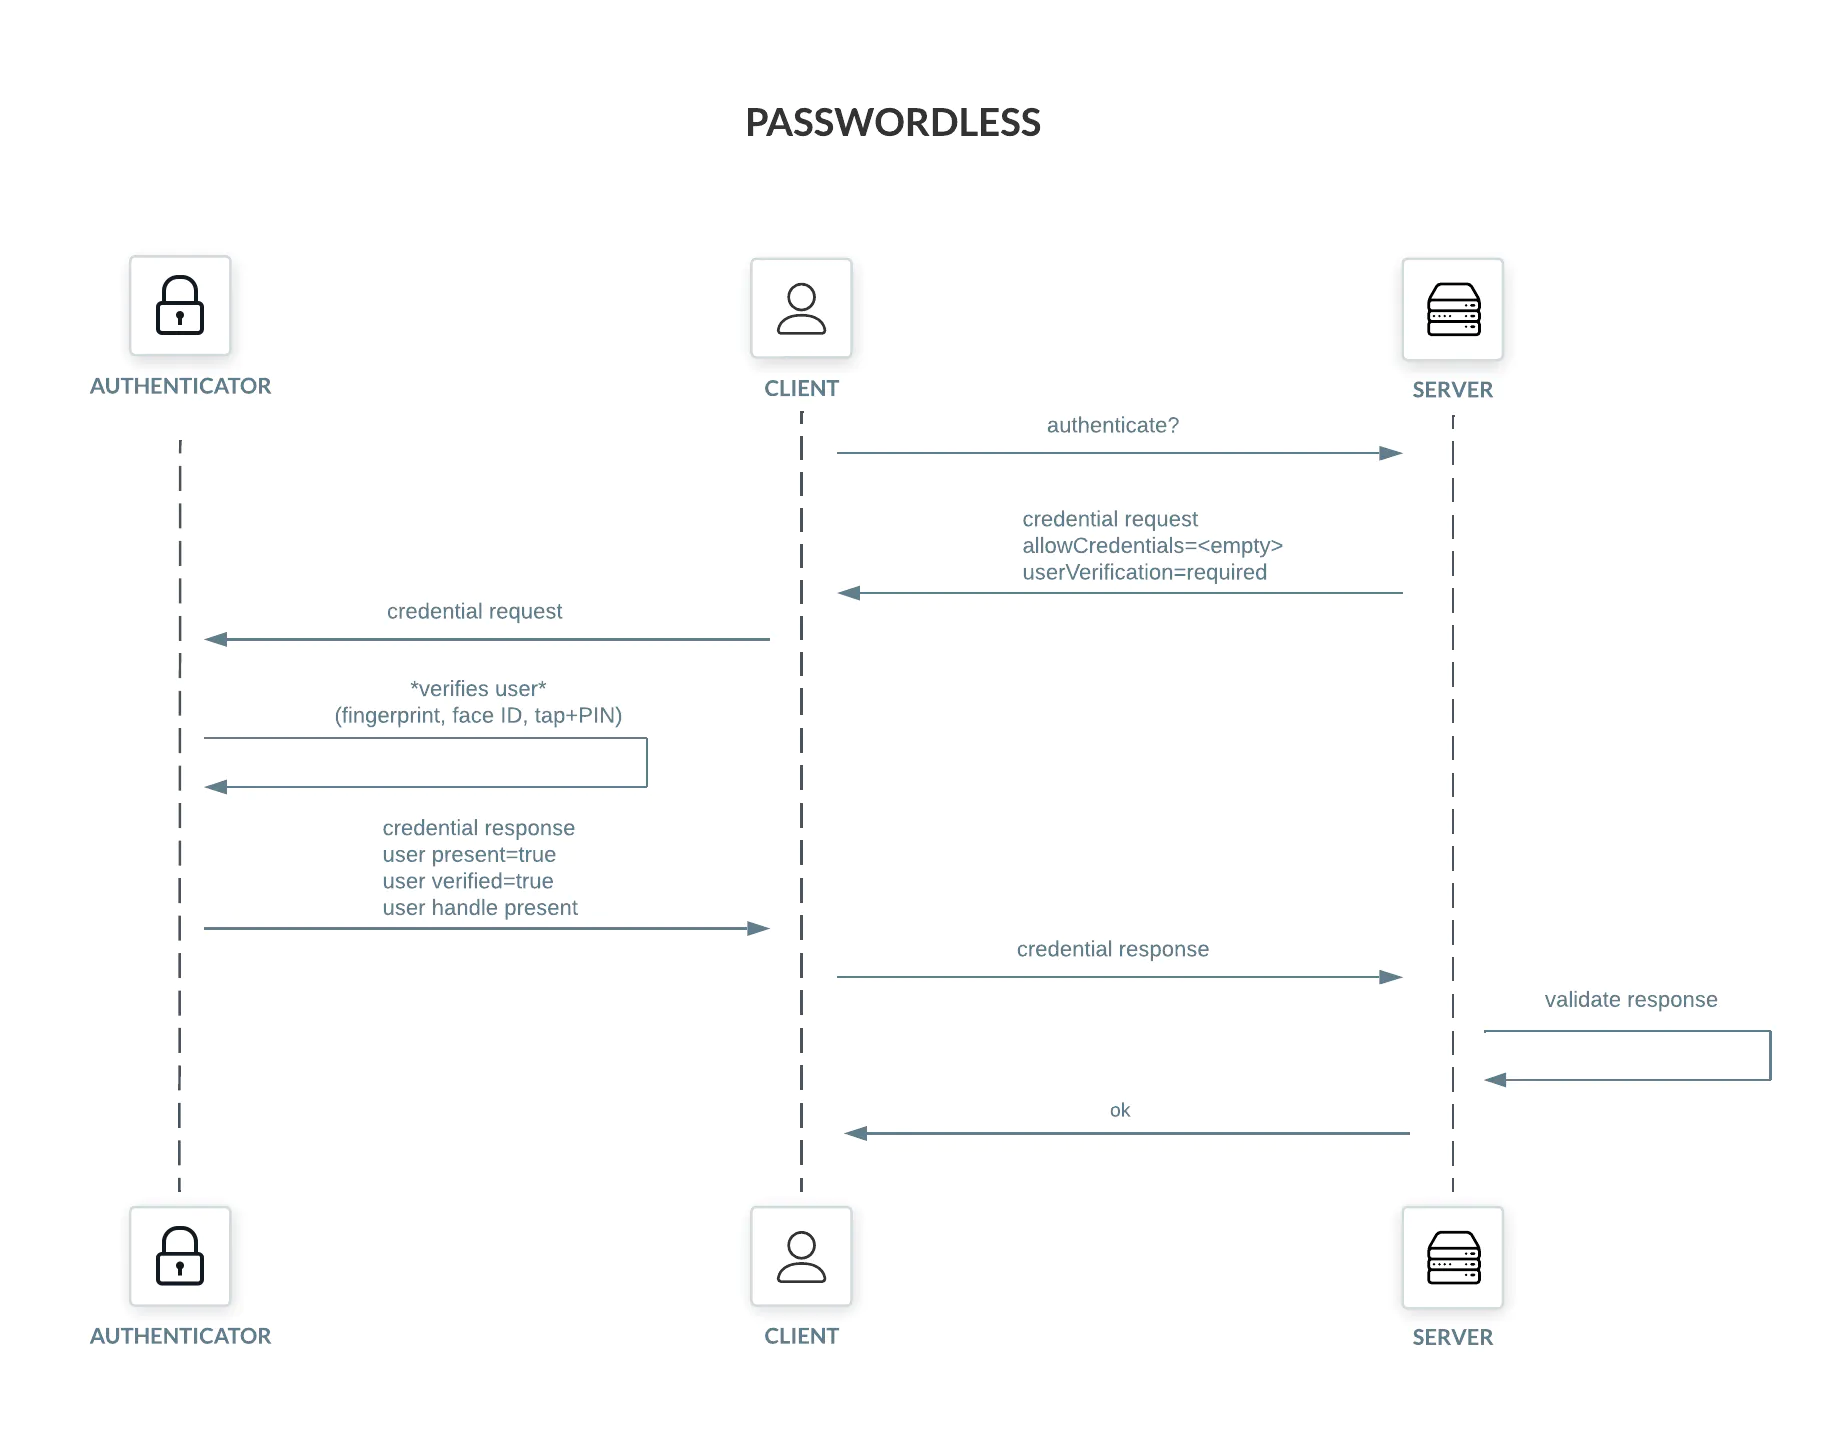
Passwordless authentication starts in a different manner. The client first asks the server for a challenge, without providing any information about the users’ identity. The challenge sent to the client doesn’t have the “allowCredentials” field (the server doesn’t know the users’ identity yet) and sets “userVerification” to “required” (the server relies on the authenticator to verify the user).
Example of a passwordless challenge, aka credential request:

Having the challenge in hand, the client prompts the user for a touch and asks the authenticator to solve the challenge, including user verification. The authenticator returns a statement for each applicable credential for that Relying Party (e.g., example.com), allowing the user to pick the username it wants, if multiple options are available. After the user chooses the credential, it sends the solved challenge (with the corresponding statement) back to the server.
The solved challenge, aka authenticator assertion response, contains two important fields for passwordless (in addition to the usual 2nd factor fields): the user verification bit and the user handle. The user verification bit allows the Relying Party to safely skip password authentication. The user handle is the key used by the server to find the actual username for authentication. After determining the user, the server can find their registered authenticator public keys to verify the signature.
Example of a passwordless solved challenge, a (wrapped) authenticator assertion response:
{
  "type": "public-key",
  // ID of the credential that signed the challenge.
  "id": "GXk7M7+kbdGKy2atYYvJve0VvT9u9CxQpLDQhRy0DlsZfzG424WxzgLNxi631PlawIIoHcI9GYT6Mjb50S/TKg==",
  "response": {
    // clientDataJSON contains:
    // - the ceremony (webauthn.get),
    // - the challenge; and
    // - the origin (https://example.com).
    "clientDataJSON": "eyJ0eXBlIjoid2ViYXV0aG4uZ2V0IiwiY2hhbGxlbmdlIjoiNXdQQXdHSTV4bktDeHdVMmpqRjY4NjdoUzVQWm1vY0tnMDh0ZVpPMlJWdyIsIm9yaWdpbiI6ImV4YW1wbGUuY29tIn0=",
    // authenticatorData includes the user presence and verification bits.
    "authenticatorData": "o3mm9u6vuaVeN4wRgDTidR5oL6ufLTCrE9ISVYbOGUcFAAAAKg==",
    // signature signs a combination of authenticatorData and clientDataJSON.
    "signature": "ZfYMKD0jQi4xA+BHONBMhJi1IpCzO3m3NnuM8v3E2f4r/8bpTHopHMUT/Qc2f080h0o5Impd3cnUbts43iB9d5c9NdMsuQ==",
    // userHandle identifies the user for the server.
    // It's distinct from the username.
    "userHandle": "Kn3mxi8HCzVUyEK2STilrw=="
  }
}
That is a typical passwordless authentication flow. Note how the various building blocks tie together:
We talked about the ideas of proof of identity and proof of presence (addressed by user verification and user presence). We’ve discussed attestation and how it allows the Relying Party to make assertions about the provenance of authenticators. We also talked about how good authenticators can’t be driven purely by software, requiring some sort of physical contact to unlock access to its private keys. All those characteristics combine to make a system that is difficult to circumvent or brute force.
WebAuthn is based on public-key cryptography, allowing the private key to never leak from the authenticator. Because of user verification, the server doesn’t have to keep any shared secrets, such as a password or TOTP (Time-based One Time Password) secret. The lack of shared secrets removes a common and rather dangerous category of attacks: stealing passwords from the server. Even if an attacker manages to steal a passwordless user database, all they are likely to get is a list of usernames and public keys. Thanks to the wonders of public-key cryptography, knowing the public keys of authenticators is not an avenue for attacks.
Presential attack vectors remain. Locking your screen, having a strong local user password and safeguarding your authenticators are as important as ever. If your authenticator has a PIN, make sure it’s strong.
As an aside, we’ve mentioned PINs a few times, so you may be asking yourself what is the difference between a PIN and a password. The difference is that PINs are not sent to a remote server. For example, the authenticator PIN is only sent to the authenticator. Also note that PINs often don’t have to be small or numeric: pick a long, alphanumeric PIN if you can.
As much as we already discussed, there’s plenty more to say about passwordless and WebAuthn.
An important omission is the registration ceremony. Passwordless registrations occupy a discoverable credential slot in the authenticator, so the corresponding flag is set in the credential creation options. Registration is also when attestation takes place, as mentioned before. Apart from those, the ceremony isn’t all that different from authentication, so details about it are left as an exercise for the reader (😉).
CTAP, the Client-To-Authenticator Protocol, was briefly mentioned. It’s an interesting topic that likely deserves a blog of its own. CTAP is commonly dealt with by browsers; there aren’t many passwordless clients other than browsers — our own tsh is one of the few.
Not all authenticator implementations are CTAP-based. Secure Enclave-based authenticators, such as Touch ID, use different mechanisms and are able to provide OS-level APIs for programmers. They provide similar guarantees as your usual hardware device, but go about it in a different way.
In the forefront of passwordless today are Passkeys. The initiative solves a common limitation of authenticators, which is that registrations are tied to a particular device. For example, a Touch ID registration made on your MacBook won’t carry over to your iPhone, except that if Passkeys are enabled it will. Apple, Google and Microsoft are some of the major players in this constantly-evolving scenario.
Passwordless is an example of how great security doesn’t have to compromise usability, but instead improves it. Gone are the days of remembering mysterious sentences or relying on password managers. (Ok, not gone yet, but we are getting there.)
Passwords are ubiquitous and well-understood by end users. Their advantages and shortcomings are well known. The same can’t be said (yet) of hardware keys, Secure Enclaves and biometric sensors. It’ll be interesting to observe this new journey, how users understand and employ those new technologies, as well as the push to make them better, more intuitive and more accessible.
If you are curious to learn more about WebAuthn or U2F, the following blog posts go into different aspects of it:
For a technical dive, including discussion of Teleport internals, see the Passwordless Request For Discussion by yours truly, along with its siblings FIDO2 and Touch ID.
There are also the excellent webauthn.guide and webauthn.io introductory sites, and, for the brave, the Web Authentication specification.
Finally, if you want to see passwordless in action, try it out on Remoteler.